This is going to be a long one. I have spent countless hours setting up my Proxmox VE and the VM’s and LXC containers on it. It occurred to me that it might be wise to have a decent backup solution for this, in case something goes catastrophically wrong. Luckily Proxmox provides a ready-made solution for this and it is called Proxmox Backup Server or PBS for short. This post will go through how I set this up on my system.
Assumptions
I will be making a number of assumptions in this article regarding the setup of the server and about you, namely:
- It is running Proxmox 8.x or newer.
- Proxmox is installed on its own drive on the server (in my case this is an nvme drive, not that it matters).
- There’s a separate physical disk (an SSD in my case) where backups will be stored.
- The backup drive is mounted at
/media/backups. You may use a different mount point, this is just the one I use. - Ownership for unprivileged LXC access of the backups mountpoint are set with
chown -R 100000:100000 /media/backups/Why 100000? Unprivileged LXC containers map UID 0 (root inside container) to UID 100000 on the host. This allows root in PBS to write to the directory. - You know your way around basic networking.
Caveats
While this setup is reasonably safe, there’s some things worth mentioning. Having the backups on the same server as the Proxmox install means that when there’s a fire, flood or whatever else that can physically destroy the server, you lose everything. The Proxmox install and the backups. It’s always smart to have off-site backups. This article will not be covering that. That being said, having Proxmox on a different drive than the backups means that if the Proxmox drive fails, you still have the backups. If the backups drive fails, you still have Proxmox and can redo the backups. If both drives fail at the same time, which is unlikely, you lose all data.
Installing PBS
To install PBS, we will be using a Helper Script. This script will automate the install.
The script we’ll be using can be found on the Proxmox VE Scripts website1. Under How to install you can copy the install command. At the time of writing this, that would be bash -c "$(curl -fsSL https://raw.githubusercontent.com/community-scripts/ProxmoxVE/main/ct/proxmox-backup-server.sh)". Now go to the web UI for Proxmox and navigate in the left dropdown menu to Datacenter → node (this can be named, mine is named pve). Then in the menu to the right of the dropdown (the secondary menu), click Shell.
The center of the screen will now display a shell/terminal interface. Paste the command we just copied here and press enter. A Terminal User Interface, or TUI will pop up. Select 3. Advanced Settings. Set the following values in the prompts that pass by:
- Unprivileged container.
- The root password of your choosing.
- Container ID of your liking (I use the default).
- Hostname of your choosing (I also leave this default).
- Disksize (Leave default).
- CPU cores (default).
- RAM (default).
- Network bridge (You likely have one choice here, if you have multiple you have set up another bridge yourself).
- IPv4 select Static (manual entry).
- Set the IP address. I have an internal network set up and I’ll always use 10.10.10.x. Whereas this is container ID 116 for me, I’ll pick 10.10.10.116/24. You will need to know how this is set up on your network and system, do not copy my values here!
- Gateway I have set at 10.10.10.1. You need to know what yours is and cannot blindly copy this value.
- And for everything else, using the default settings is fine. You can Enter through the rest of the prompts.
Next up select the location where you want the LXC container to be located. This is likely local-lvm (lvmthin). After selecting this, have a little patience while the script sets up the container. This would be a good time to have a pee break or grab yourself a new drink.
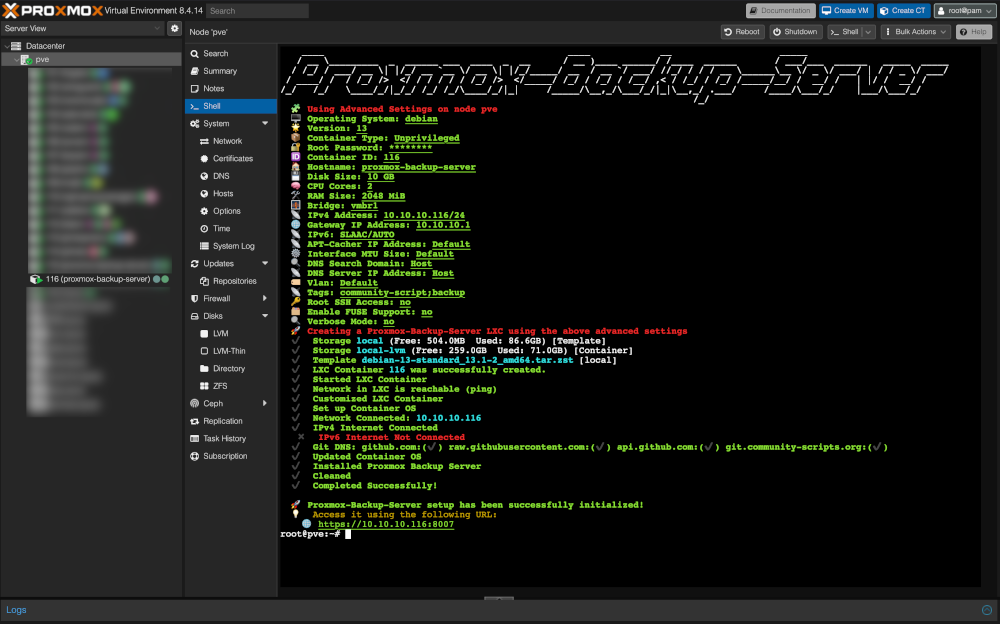
If everything went well, at the bottom of the output will be the URL you can visit to find your Proxmox Backup Server. Mine’s at https://10.10.10.116:8007. Visit your URL and check that you can log in with your credentials.
You’ll be greeted with a nag message about No valid subscription. This can be safely ignored. For now we won’t touch this interface and instead go back to the Proxmox VE browser tab to continue.
Adding Storage Mount Point to the LXC
In order for PBS to be able to access the /media/backups mount point, within Proxmox VE, we need to go back to the Shell. We get there by clicking Datacenter in the left menu and then in the secondary menu clicking on Shell. Here we’ll stop the PBS container, add the mountpoint to the configuration file of the container and then restart it.
- Stop the container by issueing the following:
pct stop <container id>, where container ID in my case would be116. (I’ll be using this from here on in, substitute all116mentions with your container’s ID!) - Check if it stopped with
pct status 116. It should display status: stopped. - Next we’ll add the line needed to the right configuration file:
echo "mp0: /media/backups,mp=/backups" >> /etc/pve/lxc/116.conf, where themp0:line creates a bind mount. The first part/media/backups) is the path on the Proxmox host, and the part aftermp=is where it will appear inside the container. Theechoin front and the>> /etc/pve/lxc/116.confparts just mean print the quoted part into the configuration file. - Check if the line got written to the file with
cat /etc/pve/lxc/116.confand at the very last line of the output you should seemp0: /media/backups,mp=/backups. - Restart the container with
pct start 116. - Check if the container is running with
pct status 116.
Now go back to the PBS IP address, https://10.10.10.116:8007 in my case, and verify the drive is present by going to Administration → Shell in the left menu. In this shell issue the following: touch /backups/test. If you get no output, the drive is mounted right and the permissions are set properly. If you get permission errors, you’ll need to fix permissions.
We can remove the test file we just created with rm /backups/test.
Create Datastore
In order for PBS to be able to run backups, we need to set the Datastore. On the PBS web UI, in the left sidebar, navigate to Datastore all the way at the bottom and click Add Datastore. A popup will, well, pop up. Here fill out the following fields:
- Name:
backups(or any name you prefer) - Datastore Type: Local
- Backing Path:
/backups
You can set the GC Schedule (Garbage Collector Schedule) and the Prune Schedule here to whatever you like. I’ll leave it to the default of Daily. You can set this to whatever you like later in the settings. Same goes for the Prune Options. I’ll leave these blank for now. Click Add.
Create Backup User
Next up we’re going to create a user that will run the backups. We’re doing this so the backups are not being run by the root user. The root user has far too many permissions and could wipe out the PBS if something goes wrong. With setting up a user with fewer permissions, we can make sure only certain intentional actions will be taken.
On the PBS web UI, in the left menu, go to Configuration → Access Control. Here go to the User Management tab (it does so by default). Here we can set up our new user:
- Click Add.
- Fill out the fields as you like. I named the user backup and gave it a strong password. The Realm can be left as is. Make sure you do not let the user expire.
- Click Add.
Our user has been created. We now will need to give him some privileges. In the left menu, head over to Datastores and select the datastore we’ve just created. Mine’s named backups. Here in the top menu click on Permissions. Click Add → User Permission.
- In the User: field, select the backup@pbs user (or whatever you’ve named yours. Note that the @pbs got added automatically—this is normal).
- Then under Role select DatastoreAdmin.
- Click Add.
Now all we need to do is get the Certificate Fingerprint, which we need for the next section. In the left menu, head over to Dashboard. Here click on the button Show Fingerprint. Copy this and close the popup.
Add PBS to Proxmox VE
Open the Proxmox VE web UI. In the left menu, navigate to Datacenter. In the secondary menu click on Storage. In the top menu click Add Proxmox Backup Server. A new popup appears where we need to input the following:
- ID:
backups(This is just a name. You can choose any you like). - Server:
10.10.10.116(This is the IP of the PBS). - Username:
backup@pbs(This is the user we made). - Password: The password you chose for this user.
- Datastore:
backups(This is the name you gave the datastore). - Fingerprint: Here paste the fingerprint you copied at the end of the last section.
Click Add. PBS has now been added to Proxmox.
Create Backup Schedule
We’ll want the backups to run on their own without needing user interaction… so let’s set that up now. On the Proxmox VE web UI still, in the left menu click on Datacenter. In the secondary menu click on Backup. In the top menu click Add. We’re greeted by another popup. There are several fields here, but we only need to fill out a few, namely:
- Storage:
backups(Or whatever name you used as ID in the previous section). - Schedule:
4:00(I prefer my backups to run when I am not using the server. You can see the options you have by going through the dropdown menu. My setting here means the backups run every day at 4am). - In the bottom pane you can see a list of all your LXC containers and virtual machines. Using the checkboxes you can select what you want to back up.
- Click Create.
We’re basically done now, but let’s verify it all works.
Verifying the Setup
Within the Proxmox VE web UI, in the left menu click on Datacenter. In the secondary menu click on Backup. Next highlight our PBS backup and in the top menu click Run now and click Yes on the popup. You can see what is going on by double clicking the running task named Backup Job in the bottom pane of the web UI labeled Tasks. This will bring up a popup that shows the backup in progress. When it’s done, it’ll end with Task OK is all went well.
Let’s now move over to the PBS web UI and see if it shows the backups. In the left menu navigate to Datastores and click backups (or whatever you named your datastore). In the top menu click Content. A list of backed up containers and virtual machines should show up here.
When your scheduled backups have ran, you should also check if that went without a hitch. You can do that here as well by looking at the timestamp.
Final Notes
Not everything is covered in this article and many more things can be set up, like email alerts, garbage collection and prune jobs and their frequency. Extra things like removing the nag message about the repositories when logging in and much, much more.
You may also have noticed none of this is backing up Proxmox itself at all, which is true. At the time of writing backing up Proxmox like a container isn’t supported by PBS. It’s on the roadmap though, so fingers crossed. At a later date I’ll share my current solution to this problem.
