I have a homelab. It runs many services for me, each in their own little container with its own IP address. Considering none of these services are ever reachable from outside my network (apart from if you’re connected to my VPN), I never felt the need to introduce domain names or HTTPS/SSL. I had a simple web page that had a bunch of links to the IP addresses—complete with port numbers—that I used to navigate these services in my Firefox-based browser: Librewolf.
This works fine, but the first time you click an address that does not have HTTPS, you get a warning (if you have HTTPS-Only Mode enabled—which you should):
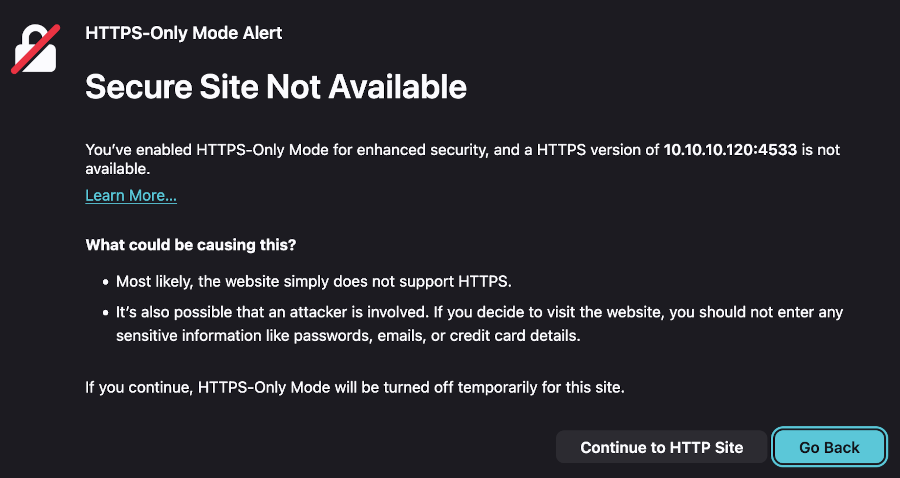
Clicking Continue to HTTP Site would then take you to the website. It’s a minor inconvenience as you only have to do this once per address in the browser.
I switched to Nix (on my Mac) and when Nix rebuilds, the browser will be rebuilt as well (sorta), meaning it forgets permissions you gave before. This means it will ask you again for every IP after each rebuild. I rebuild my Nix system quite often, so this would not fly anymore.
We’ll be setting up Let’s Encrypt certificates using a DNS-01 challenge, since that only requires a public DNS TXT record, meaning it never requires the server itself to be reachable from the internet. I decided to use Cloudflare as the DNS provider. For this all to work, you need the following:
- A domain name
- A Cloudflare account (free)
- A homelab, server, or VPS
- An instance of Pi-hole
- An instance of Nginx Proxy Manager
DNS Hosting on Cloudflare
First we will need to add the (new) domain to Cloudflare. To do so log in to the dashboard and go to Domains → Overview. There click the blue button in the top right labeled Add domain.
On the next page you’ll get a choice of three options: Connect a domain, Transfer a domain and Buy a domain. Pick transfer if you want Cloudflare to become this domain’s registrar, click buy if you want to buy one from them directly or—what I did, since I already had a spare domain: connect a domain. This will keep the domain registered where you bought it, but lets Cloudflare manage it.
On the next page enter your domain name. I’ll call mine poop.com for this post, as I am super duper mature. Next, I left all the rest as is—the AI stuff is not going to matter as it’s all on my local network anyway. I did leave Import DNS records (but that was because I use this domain for email as well—[email protected], if you will).
The next page will ask which plan you want, or in my case:
I selected the free plan, which is plenty for me.
On the following page it’ll list all your DNS records. Make sure these are correct, and if you use this domain for email (not hosted on Cloudflare), make sure those records are correct and any email-related TXT or CNAME records are not set to Proxied. If you’re happy—move on!
The following page will show you the nameservers you should set on your registrar’s admin panel. Set them there, make sure DNSSEC is turned off over there too, and click I updated my nameservers.
Now is a good time to go grab a drink, as it may take up to 24 hours for the DNS to propagate. It took about five minuts on my end—but know it could be longer. There’s nothing you can do to speed this up. When it’s done you’ll get an email and the domain will be listed as Active on your Domains Overview page on Cloudflare.
Cloudflare API Token
Once the DNS is ready, it is time to get an API token. We’ll need this to validate our domain for the certificate later.
Go to Cloudflare’s dashboard and click Manage Account → Account API Tokens. Click the blue Create Token button in the top right. Name your token anything you like. Under the Permission policies header, click Edit zone DNS. A button labeled All zones in your-account-name will appear. Change All Domains to Specified Domains and select your domain. Scroll down and note that under DNS & Zones, DNS’s edit checkbox is checked. Scroll all the way down and click the Review token button. You’ll see the Review token page where you can click the Create token button at the bottom.
Make sure you copy the token you’re presented with and save it somewhere safe.
NPM & Certificate
Now it’s time to get certified. Open your instance of Nginx Proxy Manager and go to SSL Certificates → Add SSL Certificate → Let’s Encrypt. Set the domain names—so for me it’d be: poop.com and *.poop.com. Next set your email address and toggle Use a DNS Challenge on. Enter the DNS provider—Cloudflare in this case.
Next enter your API token from before like this:
|
|
Lastly agree to the terms of service and click Save.
That’s it for Nginx Proxy Manager for now—don’t close that tab though—we’ll be back.
Adding a Local DNS Record
Still following along? Open your Pi-hole admin page and click Settings → Local DNS Records. On the left side under List of Local DNS Records, left of the green box with the white plus sign, in the Domain column add your desired domain name. For example, to add a link to a Jellyfin instance, add jellyfin.poop.com. Then next to it in the IP column, add the IP of your Nginx Proxy Manager, not the IP of the Jellyfin instance!
ALWAYS add the IP of the Nginx Proxy Manager, NEVER the IP of a service!
Then click the plus icon to save it. Back to NPM we go.
Adding a Proxy Host
In Nginx Proxy Manager, click on Proxy Hosts. On that tab, click on the Add Proxy Host button in the top right. While still using Jellyfin as an example, fill out the following:
- Domain name:
jellyfin.poop.com(or rather your equivalent). - Scheme:
http. - Forward Hostname / IP:
192.168.1.108(your service’s IP). - Forward port:
8096(the port your service uses,80for a webserver for instance).
And toggle Block Common Exploits and Websockets Support on.
Next click the SSL tab. In the SSL Certificate dropdown, select your certificate—poop.com, *.poop.com in my case. Then toggle the Force SSL and HTTP/2 Support both on. Now click Save.
Conclusion
And that’s it. Open a new browser tab and enter the address you set—again, as per the example I’d enter jellyfin.poop.com and yes I grew tired of this example quite some time ago. If all went well, you’d be greeted by your service running on your custom domain with HTTPS enabled!
Now getting to this point took a lot of effort and misery and wouldn’t you know it: I ran into weirdness, as I always seem to do. My Jellyfin service loaded fine on my phone using this address. Worked like a charm on my ThinkPad. Would absolutely not load on my MacBook. Didn’t matter which browser I picked—even trying to curl the thing—it just would not load the Jellyfin service.
A whole load of dead ends later, I finally found a workaround: Manually adding an entry per hostname in /etc/hosts. This meant adding a line like 192.168.1.100 jellyfin.poop.com for each service to that file, remembering to put the IP to NPM, not the service’s IP. It’s not the prettiest solution, but at least it works.
